> ## Documentation Index
> Fetch the complete documentation index at: https://hyperframes-codex-docs-human-first-refactor.mintlify.site/llms.txt
> Use this file to discover all available pages before exploring further.
# Tour the workspace
> Learn what the main areas of HyperFrames Studio are for.
You do not need to learn every panel before making a useful change. Start with five areas.
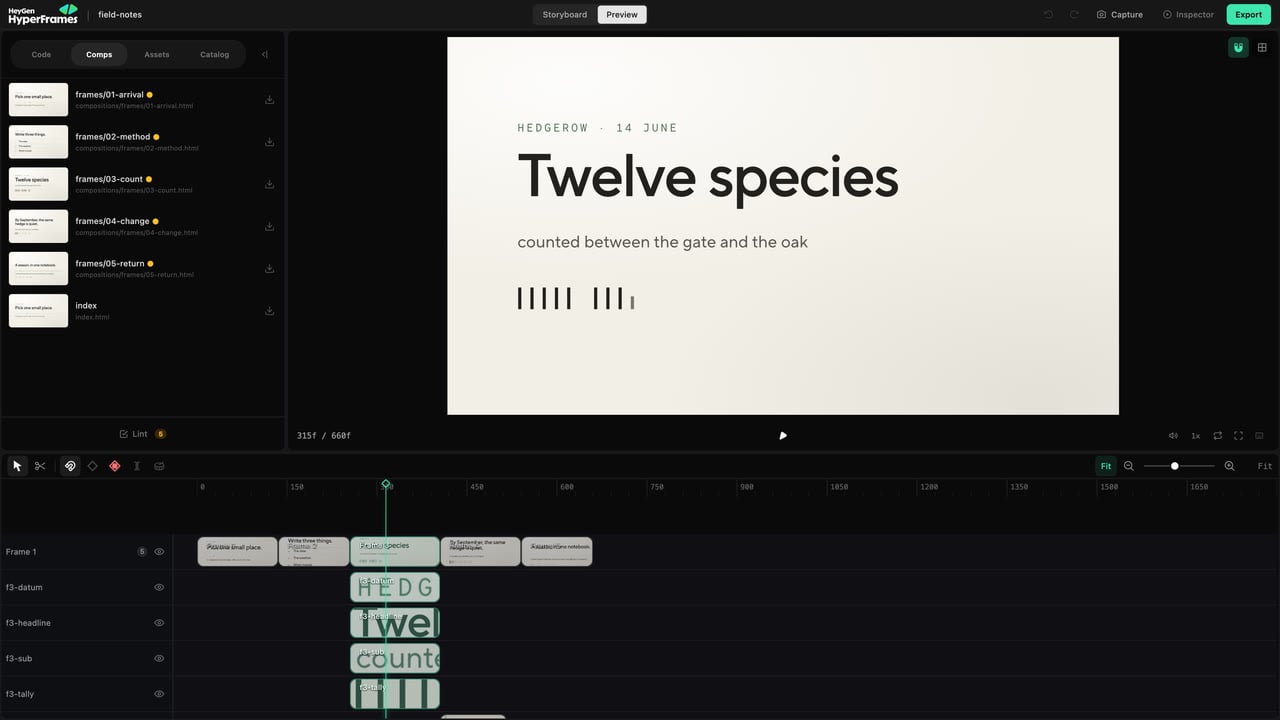 The exact project will look different, but the workspace stays familiar: project tools on the left, the live frame in the middle, and time-based editing below.
## 1. Storyboard and Preview
The view switcher changes between:
* **Storyboard** — planned frames, direction, status, comments, and agent handoff.
* **Preview** — the built project, including the canvas, Inspector, timeline, project files, media, Catalog, and exports.
Use Storyboard to discuss the idea. Use Preview to change the implementation.
## 2. Canvas
The canvas shows the current frame. Click an element to select it.
When an element supports direct editing, you can move, resize, rotate, crop, or nudge it. Selection guides and snapping help align it with the frame and nearby elements.
If an element is difficult to select, open **Inspector**, then use [Layers](/studio/layers).
## 3. Inspector
The inspector shows controls for the selected element. Depending on what you selected, it can include:
* text;
* layout and position;
* fill, border, shadow, and other styles;
* media;
* animation;
* 3D transforms;
* color grading.
Changing a control updates the preview. Undo the edit if the result is not what you intended.
## 4. Timeline
The timeline answers three questions:
* When does an element appear?
* How long does it remain?
* Which other elements are active at the same time?
Drag a clip to move it. Drag an edge to trim it. Move the playhead to inspect an exact moment. Use the razor when you need to split supported clips.
## 5. Project tools
The left side of Preview contains:
* **Code** for the project tree and source editor;
* **Comps** for compositions and sub-compositions;
* **Assets** for project and shared media;
* **Catalog** for reusable scenes and components.
The right side contains **Design**, **Layers**, **Variables**, and **Renders**. Click **Inspector** to show design and layer controls, or **Export** to open render settings.
## A safe first edit
Move the playhead or click the timeline ruler.
Click it on the canvas or choose it in Layers.
Edit its text, move it slightly, or change a simple style.
Check the edit in motion, not only as a still frame.
Use the Studio undo action or your normal undo shortcut.
Next, choose the page that matches the task: [canvas editing](/studio/canvas), [timeline editing](/studio/timeline), or [animation](/studio/animation).
The exact project will look different, but the workspace stays familiar: project tools on the left, the live frame in the middle, and time-based editing below.
## 1. Storyboard and Preview
The view switcher changes between:
* **Storyboard** — planned frames, direction, status, comments, and agent handoff.
* **Preview** — the built project, including the canvas, Inspector, timeline, project files, media, Catalog, and exports.
Use Storyboard to discuss the idea. Use Preview to change the implementation.
## 2. Canvas
The canvas shows the current frame. Click an element to select it.
When an element supports direct editing, you can move, resize, rotate, crop, or nudge it. Selection guides and snapping help align it with the frame and nearby elements.
If an element is difficult to select, open **Inspector**, then use [Layers](/studio/layers).
## 3. Inspector
The inspector shows controls for the selected element. Depending on what you selected, it can include:
* text;
* layout and position;
* fill, border, shadow, and other styles;
* media;
* animation;
* 3D transforms;
* color grading.
Changing a control updates the preview. Undo the edit if the result is not what you intended.
## 4. Timeline
The timeline answers three questions:
* When does an element appear?
* How long does it remain?
* Which other elements are active at the same time?
Drag a clip to move it. Drag an edge to trim it. Move the playhead to inspect an exact moment. Use the razor when you need to split supported clips.
## 5. Project tools
The left side of Preview contains:
* **Code** for the project tree and source editor;
* **Comps** for compositions and sub-compositions;
* **Assets** for project and shared media;
* **Catalog** for reusable scenes and components.
The right side contains **Design**, **Layers**, **Variables**, and **Renders**. Click **Inspector** to show design and layer controls, or **Export** to open render settings.
## A safe first edit
Move the playhead or click the timeline ruler.
Click it on the canvas or choose it in Layers.
Edit its text, move it slightly, or change a simple style.
Check the edit in motion, not only as a still frame.
Use the Studio undo action or your normal undo shortcut.
Next, choose the page that matches the task: [canvas editing](/studio/canvas), [timeline editing](/studio/timeline), or [animation](/studio/animation).